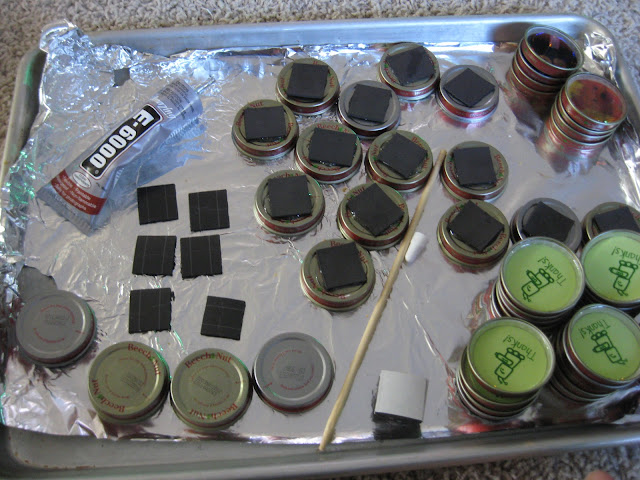
The party favors at the shower were by far the most time consuming. But nothing about the process was difficult.
Supplies:
- empty and washed baby food jars with lids.
- images for inside lid
- resin
- magnets
- E-6000 glue
- ribbon
- M&M's (or other goodies for inside the jar)
- small party favor bags
- string (crochet thread)
As soon as Pretty started on baby food, I have been saving the jars and lids, not having any craft project in mind, but knowing that they have potential.
To start the project, wash and dry lids.
I used picnik.com to create this image so it would go with the invites I had made. I printed them through Sam's Club, so they are on photo paper.
It took a few tries to get the circle just the way I needed so it would fit in the bottom of the jar, but once I did, I used it to trace around the rest of the images.
Cut them out and lay them in the bottom of the lids.
You can also use magazine images (I had more lids than I needed for favors), but be aware that the magazine paper will absorb some of the moisture and darken.
 |
| the snoring was supposed to be a joke for my hubby, but he didn't think it was funny! |
 |
| Random info: I am an EMT-I. At least I am until my licence expires at the end of this month... |
Prepare your workspace by covering it in tinfoil or some other protective covering. I used cookie sheets so I could move the whole thing up out of the way to dry.
The resin is a bit pricey, but with a 50% off coupon, it was totally worth it. It comes in 2 parts, the actual resin, and then a hardener. They need to be mixed in a 1:1 ratio ie. equal amounts of both. I eye-balled that the level in the bottles were the same after pouring.
Use tools you can toss at the end, because the resin will harden on everything it touches. Make sure to mix thoroughly.
Then pour in! I filled mine just below the lip so it wasn't completely full.
After filling them all, keep an eye on them for the first hour. Not hovering constant, but checking in because the images can float to the top, so you might need to poke them back down with a stick. They harden pretty quickly, but should sit for 24 hours before doing anything else to them. I had a few that never fully hardened, and were tacky to touch. I think these must have been the resin I scraped out of the bottom of my cup so the mixture wasn't as equal. I used some of my wood sealer to paint over the top. It worked great, but did leave the image a tiny bit cloudy.
The next step was to glue magnets to the back. I cut squares from my flat magnet roll, and glued them on using E-6000. I tried hot glue at first, but they pulled off. . . The thin magnet works to hold the lid onto the fridge, but it won't hold up any paper... so it's more decorative than useful (sorry shower goers!). I would suggest getting the thicker round magnets for a stronger more useful magnet. But this stuff also says to dry for 24 hours.
To complete the favor, I separated red from green of the holiday M&M's.
Used hot glue to attach ribbon around each jar:
Then filled them all with the green M&M's.
The last step was putting it all in a bag, with the image face up and tying it closed with crochet thread.
A great little favor! I'm considering this for a little holiday neighbor gift, using up all those red M&Ms! If only I hadn't picked such random images for my other magnets. . .


10 comments:
I just completed a bunch more of my magnets too and I was super disappointed when so many of them darkened. I would say that of about 75 that I did, at least 15 aren't useable. I wish I could tell when that was going to happen, so I wouldn't use that image. Or that magazine in general. I think I am going to keep making these and have a supply around for random gifts. They make good fillers.
These are awesome!! I'm getting ready for my son's 1st birthday and these are going to make great favors! So when you assembled them in the bag, is the top and bottom just kinda stacked, not attached?
Amanda,
They are just stacked. I filled some lids with more resin than others, but all of them were full enough to cover the threads so they wouldn't screw on. Plus, this way makes a prettier view than the magnet side!
Thank you for sharing. I have a full bag of jars, saved for the same "some day" reason! I'm glad to see this.
that is a cute idea! thanks!
I'm doing this for my wedding favors but instead of using candy i'm making candles. Great idea!!
Found these on Pinterest.. I think they are absolutely adorable! Looks like hard work, but totally worth it. Thanks for sharing!
xo alanna
iheartlaughing.blogspot.com
That is so cute!! That is a awesome and recyclable idea lol
Great idea. Can I use photo paper instead? Will it turn dark? Thank you!
to keep the image from getting dark it has to be sealed in like with mod podge or glue, I was wondering if I can use clear nail polish to seal it (still have to try this) & to keep the image from floating it is best to glue it on the lid :)
Post a Comment