12.29.2010

Pretty's Black Apple Doll

I have plans to make Pretty a large fabric doll that has several outfits for her to change and play with. But at 9 1/2 months old, she is too young for such things. But a Black Apple Doll is perfect. Perfect size and no loose clothes or accessories to worry about.

So that's what I made her for Christmas. 


I love the flowers in the hair and on the dress. And my embroidery is getting better. . . sort of. . .


From the moment Pretty saw this doll, she has been in love! I've never seen a child attach so quickly to a toy as she did to this doll! She clings to it at night, when she's tired or upset. And with our house being attacked by the cold virus this last week, she's had plenty of upset moments where only giving her this doll has worked to calm her down.

look at the whites of her fingers with how hard she's gripping it!


It warms my heart every time I see her clutching it to her.


Or inspecting the flowers.


Or giving it kisses.


I love this doll, and I LOVE that Pretty loves it!

12.26.2010

Christmas Morning

Here are my favorite pictures snapped Christmas morning.


Pretty and her stocking

Hero's reaction to getting the pink dog (Zhu-Zhu pet) he asked for.


Me with the kids and the frog blanket Hero picked out for me.

Merry Christmas!!


And I am proud to say that the Black Apple doll I made for Pretty is her favorite thing now. More on that later. The great thing about Christmas being on Saturday, it easily spills into Sunday. It's like 2 days of Christmas! So, I'm off to spend more time with family.

12.22.2010

Did you know . . .

While both male and female reindeer grow antlers in the summer, according to the Alaska Department of Fish and Game, male reindeer drop their antlers at the beginning of winter, usually late November to mid December. Female reindeer retain their antlers until after they give birth in the spring. Therefore, according to every historical rendition depicting Santa’s reindeer, every single one of them, from Rudolph to Blitzen, had to be a girl. We should have known. Only women would be able to drag a fat ol’ man in a red velvet suit all the way around the world in one night and not get lost!


No, I didn't write that, but I don't know who did to give them credit. . .


image found here


As we are getting within reach of Christmas morning, I feel like the reindeer. We moms (and dads) do all the work and Santa is the one who shows up last to claim all the credit... But I think it's worth it. 


Good luck to all you out there doing the last minute sewing and buying. I know I'm one of them, having bought supplies for a few gifts last night!

12.18.2010

The Bench Make Over.

A few months back, in the peak of yard sale season, I stopped by a joint sale put on by several of my neighbors. It was near the end, so the majority of the items I found, they just gave to me. But this item, the old owner was planning to take it home if it didn't sell. But she gave it to me for $3! Score!

The legs were ugly gold, slightly tarnished.


And the white seat was stained.


So I bought it with the idea to recover and paint it. It sat there for months as is, until the idea of lots of people coming into my home for the baby shower spurred me to action. I bought a yard of fabric from IKEA for $7/yd (expensive, but worth it!) and some spray paint from WalMart for $3, and went to work.

I had planned to do a whole tutorial, but then two things happened:

1. I realized that the chances of anyone having this bench too was slim,
2. I was too excited to get it done that I forgot to take pictures the whole way through! oops.

But I will give you some basics.

First, remove the legs from the seat, spray paint legs in the garage (and forget to take pictures...)

Then, remove the old fabric. There was a black cover to hide the bulk of the white fabric and give it a nice edge, secured by staples. I used a screw driver to pry them loose, and kept the black cover to reuse it.


Of course, it is impossible to do any project on the ground without help.


After the black piece is gone, remove the fabric. Make sure to watch how it was put together, so you can recover it in the same manner.


I was happy to find that there was a muslin layer under the main fabric. This meant that I didn't have to worry about placing the padding! I used Febreze to get out any left over smell (which, luckily, this didn't have. . .)


I laid out the old fabric flat and used it as a pattern for the new. This picture doesn't help much, but I swear they are the same size!


Here's where I got giddy and forgot the camera. After trying to borrow a staple gun from either set of parents without success, we decided to invest in our own.


 I love this thing. It made me feel super powerful.


To recover, I laid the fabric right side down, like it is above, and centered the seat on the fabric. Using the awesome stapler, I secured the corners on the same long side, then secured the long side in between them. Then I moved to the other side and corners, pulling tight. Staple a lot to make sure it's secure. Then I added back the black piece for a finished look.

Attach the seat to the newly painted and dried legs, and BAM! A whole new look!


I love the way the gray and yellow go together. (the yellow is Krylon Bright Idea spray paint)


After finishing this, I asked my husband if (when we have our own home) I can have a yellow couch. He said yes!


But I'm thinking a gray couch would be a better choice. Maybe I need a yellow arm chair...

12.17.2010

Lost in Translation

It turns out that I'm the jerk. I hate it when that happens!

I have been emailing back and forth with Myriam. She speaks French and I do not. I was using an online translator. I was under the impression that she was listing my entire blog under her blog. There was always a banner at the top when I would click over. It was frustrating me and I asked her to take it down, to please only use text links.

After a few emails, it became clear to me that we were not understanding each other. So I enlisted the help of my sister-in-law who speaks fluent French. She helped me to understand that Myriam was only listing links as I asked her to, but her host site of over-blog.com would catch the clicks by adding their banner over top of my site. When I see it, it is in English, but I'm starting to wonder if it translates it into French...

Either way, while I was in the process of figuring this out with the help of my sis-in-law, Myriam was getting upset and wrote a post complaining about me and telling her readers to not come to my blog. And now that I see what's going on, I completely understand her anger.

So this is to apologize to her and to her readers who have been linking over. I did not mean to offend. This whole thing was a bad joke of bad translation. I hope she forgives me, and if she never wants to link me again, I'm just going to have to respect that.

It still bothers me that over-blog.com would put my blog under their banner. But Myriam didn't do it.

So again, I'm sorry, Myriam.

12.16.2010

Remember this pile of squares? Well, after a bit more work, each pair became . . .


A Christmas Angel. . .

Pattern found here

Each angel was given a name tag with the year stitched on the back.


Each year, my parents give the whole family ornaments. When I was growing up we used to get 2. One from them and one from a great grandmother who had been dead for years. . . I know that sounds weird. But this amazing woman had crocheted so many little ornaments that there were enough for everyone in the extended family, down to us great grandchildren, for 5 years after she was gone. I'm not sure how she did that!

I offered to make these a year ago, as a bit of a return to days of our childhood. 14 Angels at almost 2 hours of work per angel = 28 hours of love! Good thing I started making these back in July!


I love the homemade ornaments. They add personality. Now, I may change my tune in a few years (like Vanessa over at V and Co. here and here, she cracks me up!) but I was super excited to have Hero bring home this cute little star from pre-school to hang on our tree!


He's so talented. *gush*

12.15.2010

it's a way to show off how awesome you are.

I have wondered ever since starting this if anyone ever made anything off of any of the tutorials I have. So I've decided to make a Flickr Group to see what you all have been doing! Feel free to post anything you have made from a tutorial from this blog! Make sure to put a link to your blog at the bottom (if you have one) so we can check it out in all it's glory!

So go ahead, post some pictures. Gloat a little, it's good for the skin...

12.14.2010

Baby Food Jar Party Favor Tutorial

The party favors at the shower were by far the most time consuming. But nothing about the process was difficult. 


Supplies:

  • empty and washed baby food jars with lids.
  • images for inside lid
  • resin
  • magnets
  • E-6000 glue
  • ribbon
  • M&M's (or other goodies for inside the jar)
  • small party favor bags
  • string (crochet thread)

As soon as Pretty started on baby food, I have been saving the jars and lids, not having any craft project in mind, but knowing that they have potential.

To start the project, wash and dry lids.


I used picnik.com to create this image so it would go with the invites I had made. I printed them through Sam's Club, so they are on photo paper.


It took a few tries to get the circle just the way I needed so it would fit in the bottom of the jar, but once I did, I used it to trace around the rest of the images.


Cut them out and lay them in the bottom of the lids.


You can also use magazine images (I had more lids than I needed for favors), but be aware that the magazine paper will absorb some of the moisture and darken.

the snoring was supposed to be a joke for my hubby, but he didn't think it was funny!

Random info: I am an EMT-I. At least I am until my licence expires at the end of this month...

Prepare your workspace by covering it in tinfoil or some other protective covering. I used cookie sheets so I could move the whole thing up out of the way to dry.

The resin is a bit pricey, but with a 50% off coupon, it was totally worth it. It comes in 2 parts, the actual resin, and then a hardener. They need to be mixed in a 1:1 ratio ie. equal amounts of both. I eye-balled that the level in the bottles were the same after pouring.


Use tools you can toss at the end, because the resin will harden on everything it touches. Make sure to mix thoroughly.


Then pour in! I filled mine just below the lip so it wasn't completely full.


After filling them all, keep an eye on them for the first hour. Not hovering constant, but checking in because the images can float to the top, so you might need to poke them back down with a stick. They harden pretty quickly, but should sit for 24 hours before doing anything else to them. I had a few that never fully hardened, and were tacky to touch. I think these must have been the resin I scraped out of the bottom of my cup so the mixture wasn't as equal. I used some of my wood sealer to paint over the top. It worked great, but did leave the image a tiny bit cloudy.

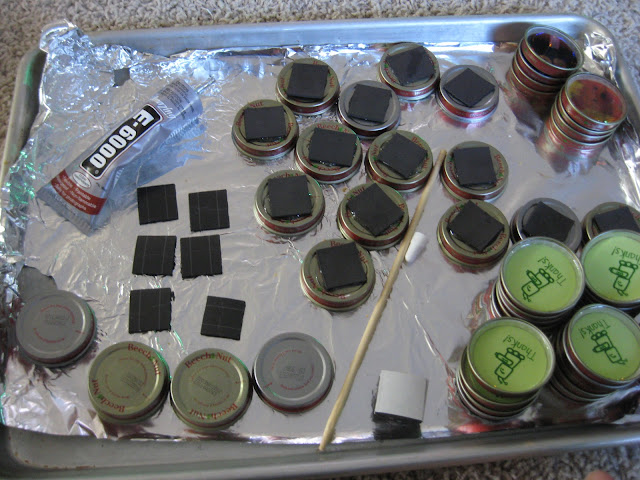
The next step was to glue magnets to the back. I cut squares from my flat magnet roll, and glued them on using E-6000. I tried hot glue at first, but they pulled off. . . The thin magnet works to hold the lid onto the fridge, but it won't hold up any paper... so it's more decorative than useful (sorry shower goers!). I would suggest getting the thicker round magnets for a stronger more useful magnet. But this stuff also says to dry for 24 hours.


To complete the favor, I separated red from green of the holiday M&M's.


Used hot glue to attach ribbon around each jar:


Then filled them all with the green M&M's.


The last step was putting it all in a bag, with the image face up and tying it closed with crochet thread.


A great little favor! I'm considering this for a little holiday neighbor gift, using up all those red M&Ms! If only I hadn't picked such random images for my other magnets. . .

12.13.2010

A Pre-Baby Party!

Also known as a baby shower! A really good friend of mine is having a baby in 5 weeks. I offered to throw her a shower with the help of her mom. It was held at my house (for my convenience with my kiddos). I loved making the invites using picnik.com:


I also got to make a diaper cake and another pair of baby booties from Amy Butler's Little Stitches book. This time the booties are made with the extra blue suede cloth from the lining of Hero's elephant hood. I loved the I-made-the-baby-blue-suede-shoes joke.


The party favors were also a lot of fun to make and so cute, using washed out baby food jars. I knew I was saving them for a reason! The lids were made into magnets, and that's what all the green M&M's where for. (Tutorial to come.)


After decorating, I had a moment of "is this going overboard?". But after looking at the pictures, it wasn't as overwhelming as I thought.


 I took advice from my sister and used crepe paper for an awesome but inexpensive effect.


I made a robot garland (tutorial from Made by Rae) and put it everywhere! There's so much of it, and I didn't want to throw it away, so after the shower, I moved it into my kids' room. It goes around their entire room and I still have more. . .


 I love the look of these pom-poms I made using this tutorial. It was so fast. 16 sheets of  tissue paper, small wire, 10 minutes, and I had 2 pretty accents for above the gift table.


My favorite part of the planning was that I didn't have to worry about the food. Shelly's mom and I both thought we were getting the better end of the deal when we decided to split the duties with her in charge of the food and me hosting. This is my tiny table loaded with her pretty serving dishes and delicious spread.


And if you aren't drooling now, you must be crazy!

The party was fun and I still have the crepe paper and pom-poms hanging from the ceiling. They might end up staying for a while...

Congrats, Shelly, on your impending parasite!