Just reposting this from where it was originally posted last week on Craftaholics Anonymous.
Have you ever experienced the frustration of trying to swaddle your baby with a blanket, just to have them break out of it as they wiggle while trying to fall asleep? And then, of course, they don't fall asleep...
Or, have you bought the swaddle wrap with the blanket bottom and have them kick out of the bottom of it?And then they wiggle through the bottom and you find your baby with the wrap around the screaming baby's face? I've experienced both of these.
That is why I made up my own version of a swaddle wrap, the Straight-Jacket Swaddler.
I don't currently have a baby, so I traded my sister this Straight-Jacket Swaddler in exchange for pictures of my nephew using it!
It's nice and tight, holding in the baby with secure Velcro; with a strap between the legs to keep it from ending up around your baby's face. And not to worry, my daughter used one I made and was secure at night, but still able to wiggle her arms out the top in the morning when she was really awake and trying.
So let's make one!
Supplies:
- 1 light weight receiving blanket or 1/2 yd of lightweight flannel - washed, dried and ironed
- 1/2 yd (18") of 2" wide Velcro
- washable marking pen
- basic sewing supplies.
- Optional:
- double fold biased tape for edging (I did not use this, but will show you where you can if you want to.)
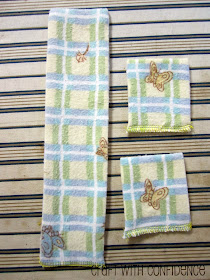
First, lay out your fabric. I used this old receiving blanket.
Cut a rectangle that is 27 1/2" wide,
and 12" tall.
Round the corners. I just folded mine in half and followed the existing curve that starts about 2" from the square corner.
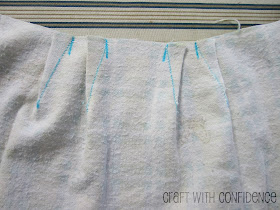
The next step is to create a spot for the neck of your baby with four darts using your marking pen. To mark the darts, lay your rectangle wrong side up and measure 6" from the center of the top right rounded corner (or 7" from the right edge) along the top long side and make the first mark. Your markings will be spaced like the following picture shows; you should have 8 marks.
(Spaces from the first mark right to left: 1" - 3/4" - 1" - 1 1/2" - 1" - 3/4" - 1")
In the center of each 1" space you just marked, measure down 2" and make a dot.
Connect the 1" marks to the dots to make 4 triangle darts.
Fold the fabric to match up the lines and sew along the lines, backstitching at start and stop on all for darts.
Press the darts out from the center space, then serge around the entire piece to finish the edge.
*I used colored thread for looks. Here is where you can use the optional double fold biased tape to edge it. You can also fold over the edge and hem to finish the edge. Or use a zig-zag stitch, what ever you choose, finish the edge now.
Now, let's make the straps. Cut one piece 18" x 3" and two pieces 5 1/4" x 3".
Fold all three pieces over, matching the 3" sides, right sides together. Pin and sew on edge of pressure foot down the long sides.
Turn and press. Serge/zig-zag unfinished edge.
Cut three 2" long pieces of the rough side of the Velcro.
Sew one 2" square onto the folded end of each strap, backstitching at start and stop. *At first I was using this narrower black Velcro, but switched to the wider stuff. It's better... but the pictures were taken, so bear with me...
With the wrong side facing up, find the center of the right short side. Measure 1" up and down from there and place the small straps (2" gap between the straps).
The straps will overlap with the edge of the large piece by 3/4".
Pin and sew on securely by sewing a square following the edges of the strap that overlaps. (Other side view)
For the long strap, line it up with the center of the darts and pin on the bottom edge. Overlap the edges by 3/4", just like the short straps. Pin and sew on securely with a square, just like the short straps.
You should now have a piece that looks like this:
Next, cut the fuzzy side of your Velcro into two 7" pieces and that will leave you with one 4" piece. Round two corners on the long side on each of the 7" pieces, so that when placed together with long sides touching, the 4 outer corners are rounded. Round all the corners of the 4" piece.
Turn the fabric right side face up and place the two 7" Velcro pieces side by side, overlapping in the center, to create a large piece. Measure 2 1/2" from the top and 8" from the right edge.
Use a satin stitch (close zig-zag) all the way around the Velcro, and down the overlapped center, to secure the Velcro. Backstitch at start and stop.
Place the 4" piece of Velcro on the left side, next to the lower short strap. Measure 1" from the side edge.
I measured 1/2" from the top of the lower strap to the top of the Velcro, but when we put my cute nephew into it, I could see that it needed to be a bit higher. So I suggest moving it up so it measures 1 or 1 1/2" from the top of the strap to the Velcro piece.
Sew on using the same satin stitch as with the larger pieces.
And you are done!!
The last step is to add an adorable baby. I suggest placing the baby's shoulders just a bit above the top edge, like this:
This is how securely wrapped he still is after wiggling while falling asleep.
Don't you love watching a baby sleep?
**Please remember to use this only while your child is sleeping on his/her back. Also, you should not use this after your child has learned to roll over.**
Thanks, Linda for having me! Have confidence and get sewing!!


I love it! I will definitely be saving this for the future. =) Thank you for sharing.
ReplyDeleteThis looks wonderful! Wish I had it when I had babies because no matter how well you swaddle, they manage to get out. At least I can make these as gifts for everyone I know with a baby!! You have a great blog!! I will be back to visit often!
ReplyDeleteYou're busy having a baby but thought I would let you know (because I'll be joining you soon) that I finally found the velcro for this (at the Highland Walmart) and made it today. I think this was my first project EVER that I didn't have to un-pick some part of the project. Thanks for the awesome tutorial!
ReplyDelete